안녕하세요🐶
빈지식 채우기의 비니🙋🏻♂️ 입니다.
요즘 AI에 대해 많은 관심과 더불어 실생활에 사용이 되는 경우가 많아졌습니다.
실제로 AI 기술을 제공하는 오픈 플랫폼도 많이 등장하고 있으며,
다수의 기업에서 진행되고 있는 프로젝트에서 사용이 되고 있습니다.
오늘은 많은 오픈 플랫폼 중 Google 에서 제공되는 Vision AI에 대해 알아보도록 하겠습니다.
1. Google Vision AI 란.
https://cloud.google.com/vision?hl=ko
cloud.google.com

Google 에서 제공해주는 머신러닝 기반 이미지 분석 AI 이다.
많은 기능이 있으나 위와 같이 4개의 기능으로 요약할 수 있습니다.
우리는 Vision API를 통해 실제 기능으로 사용할 수 있으며,
아래 이미지는 Vision AI 홈페이지에서 제공하는 분석 예시 입니다.

- Object, Labels, Text, Properties, Safe Search 가 있습니다.
- 위 이미지의 예시는 Object(객체) 가 어떤 것이 있는지 확인하고 있습니다.

- Vision API에서 제공하는 기능들은 위와 같습니다.
- 우리는 제공되는 API를 통해 이미지 분석을 실제 체험해볼 수 있습니다.
2. Google Cloud Platform 등록하기
Vision API를 사용하기 위해서는 Google Cloud Platform에 가서 프로젝트를 등록해야 합니다.
Google 클라우드 플랫폼
로그인 Google 클라우드 플랫폼으로 이동
accounts.google.com


- Vision API를 사용할 프로젝트를 생성합니다.

- 프로젝트 생성 후 API를 사용을 하기위한 3가지 설정에 대해 말씀드리도록 하겠습니다.
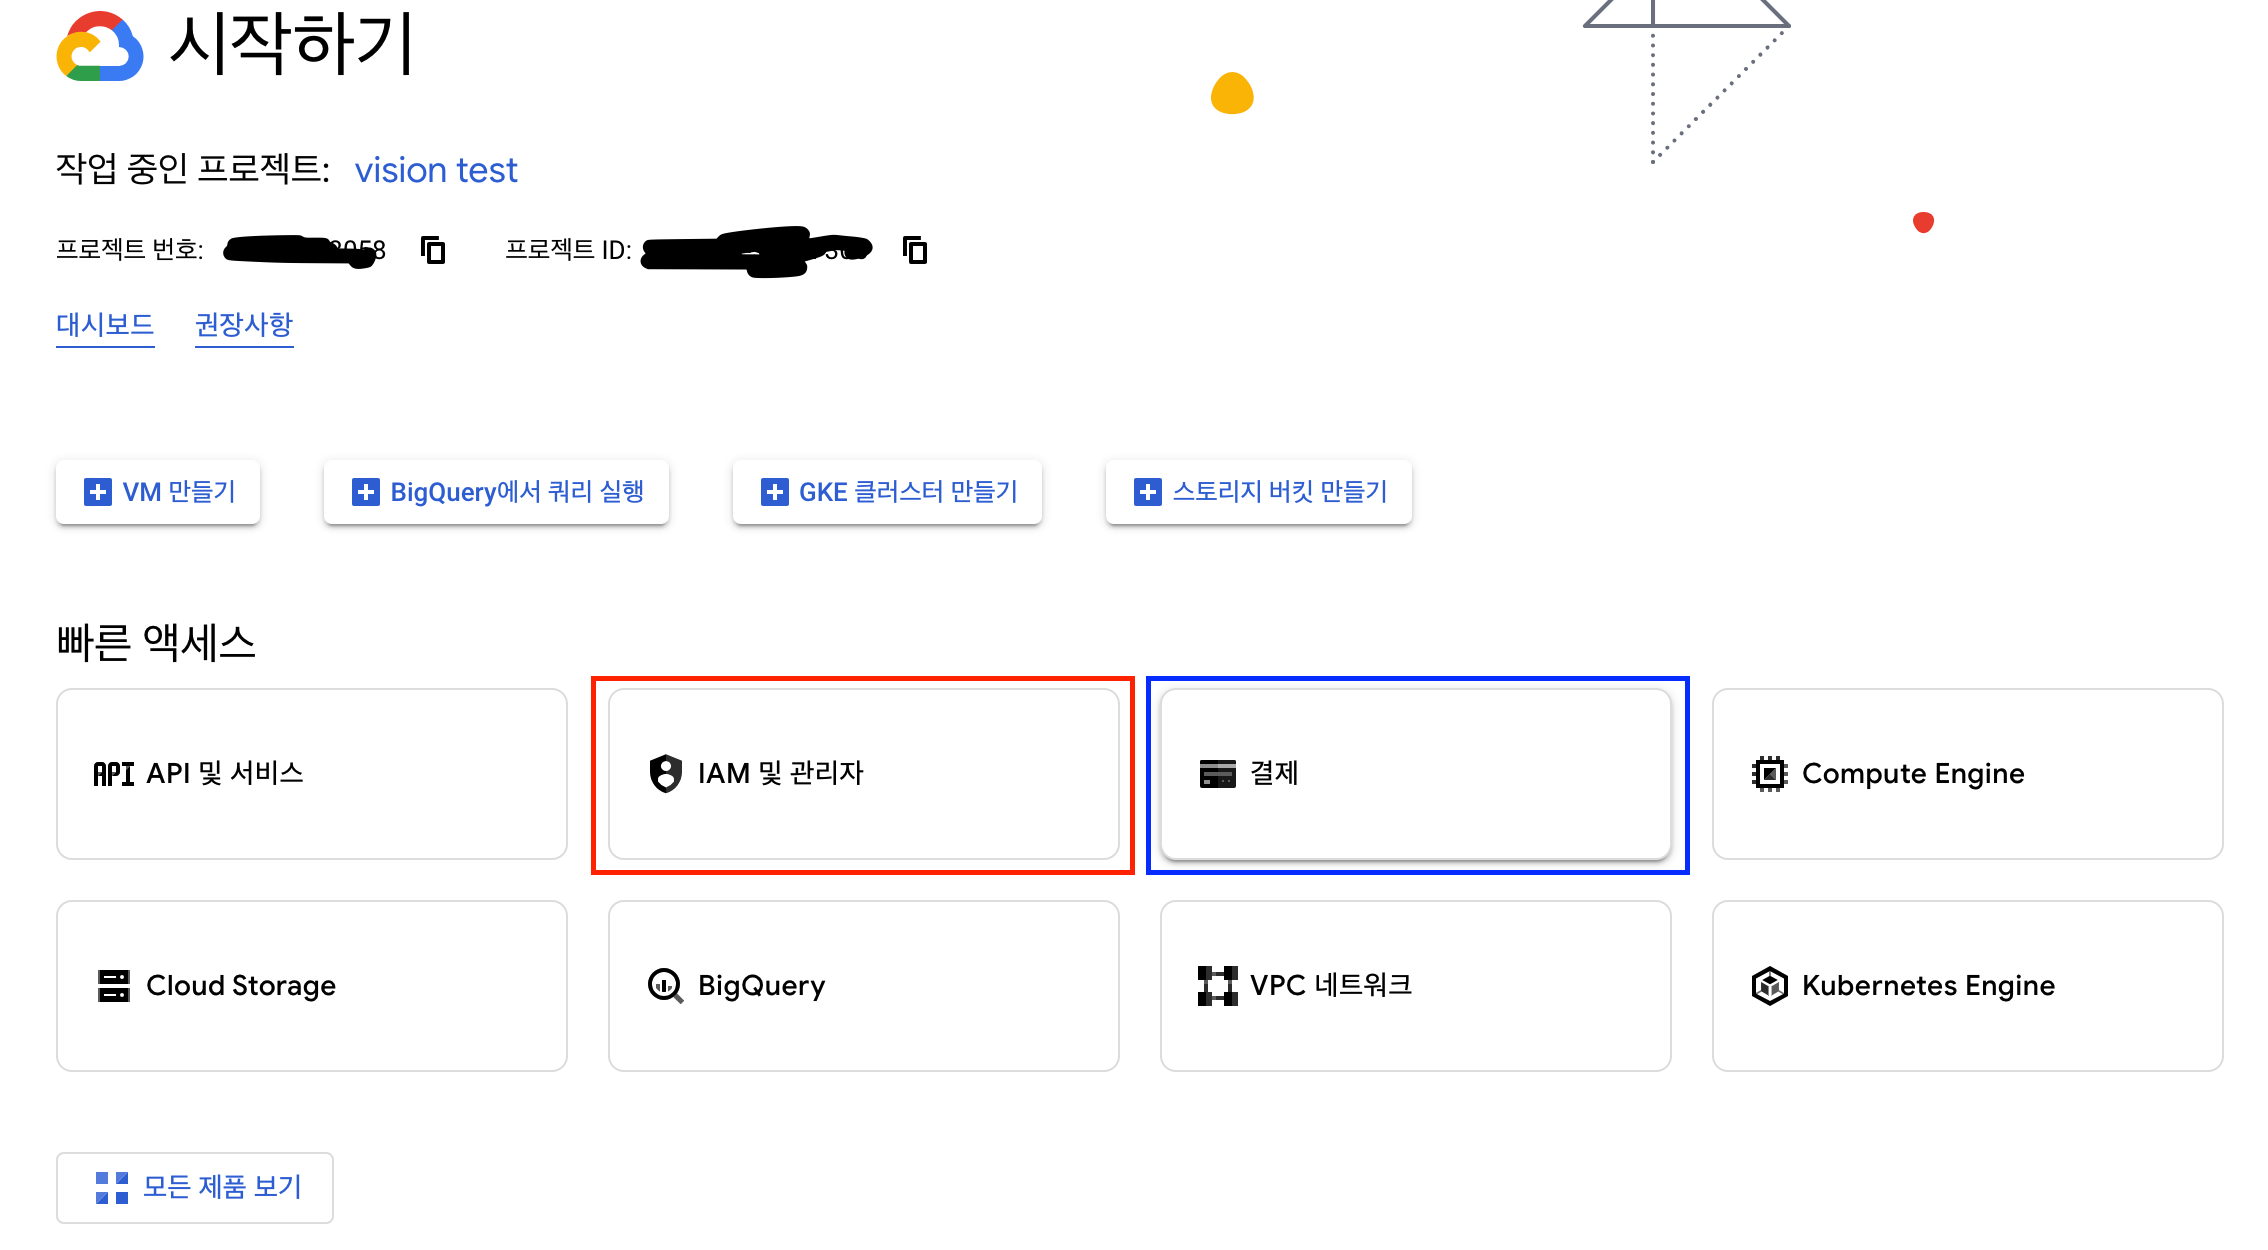
2-1. 결제 등록하기

- 계정 만들기를 통해 결제 계정을 등록시킵니다.
- 실제 결제 수단과 연결되지만 자동 구독(결제)는 없으니 안심하시고 등록하셔도 됩니다.
2-2. 서비스키 발급받기

- API 를 사용하기 위해 JSON 키를 발급받아야 합니다.
- IAM 및 관리자 탭에서 위와 같이 수행합니다.
- JSON 키는 아래와 같이 프로젝트 내부에 위치시키는 것을 권장드립니다.
2-3. API 사용 설정
Google Cloud console
console.cloud.google.com

- 위 첨부된 링크를 따라 Cloud Vision API 사용을 허용합니다.
3. Vision API 사용하기
API 사용 방법에 대해 차근차근 알아보도록 하겠습니다!
3-1. Python 가상환경 구축
각각의 프로젝트에 필요한 모듈(라이브러리)를 별도의 로컬 환경에 설치하여 사용
글로벌 설치 시 의존성 때문에 관리가 힘듬
// env 가상환경 구축
python3 -m venv env
- env 가상환경 설치
// 가상환경 사용
source ./env/bin/activate
- env 가상환경 시작
// 가상환경 종료
deactivate
- env 가상환경 종료 ( 모듈 설치 후 )
3-2. Google Vision API 설치
// Google Vision API 설치
pip install --upgrade google-cloud-vision
- env 내부 lib 에 Google 모듈이 설치가 된다.
3-3. gcloud CLI 설치
gcloud CLI 설치 | Google Cloud CLI 문서
의견 보내기 gcloud CLI 설치 컬렉션을 사용해 정리하기 내 환경설정을 기준으로 콘텐츠를 저장하고 분류하세요. 이 페이지에는 Google Cloud CLI 설치를 선택하고 유지하기 위한 안내가 포함되어 있습
cloud.google.com

- 명령어를 통해 gcloud CLI 를 초기화 시켜줍니다.
4. API 사용하기 ( Python )

- OCR에 사용되는 이미지입니다.
import os

os.environ["GOOGLE_APPLICATION_CREDENTIALS"] = '/Users/Vision/vision-api-xxxx.json'- 발급받았던 서비스키(JSON) 을 환경변수로 입력합니다.
imgPath = "../../images/combine.png"	# 사용할 이미지 로컬 위치

def detect_text(path):
    from google.cloud import vision	# Google Vision 라이브러리 사용

    client = vision.ImageAnnotatorClient()

    with open(path, "rb") as image_file:
        content = image_file.read()

    image = vision.Image(content=content)

    response = client.text_detection(image=image)
    texts = response.text_annotations
    print("Texts:")

    for text in texts:
        print(f'\n"{text.description}"')

        vertices = [
            f"({vertex.x},{vertex.y})" for vertex in text.bounding_poly.vertices
        ]

        print("bounds: {}".format(",".join(vertices)))

    if response.error.message:
        raise Exception(
            "{}\nFor more info on error messages, check: "
            "https://cloud.google.com/apis/design/errors".format(response.error.message)
        )

detect_text(imgPath)
- 위와 같이 이미지에 있는 Combine 이라는 값을 정확히 가지고 오는 것을 확인할 수 있습니다.
그 외에도!
이미지 속성, 라벨 인식, 로고 인식, 객체 인식 과 같은 기능도 사용 가능하니,
아래에 첨부된 소스 확인 부탁드립니다!
감사합니다.
참고
'기타👨🏻💻 > AI' 카테고리의 다른 글
| [AI] 이미지 웹 접근성 ( YOLO 모델 - 적용법과 간단 예제 ) (0) | 2025.02.28 |
|---|---|
| [AI] RAG 의 구성요소 2 ( Embedding ) (2) | 2024.09.04 |
| [AI] 간단한 RAG 구현 ( Anaconda, Streamlit, OpenAI, Flask, Chroma, Hugging Face ) (7) | 2024.09.03 |
| [AI] RAG 의 구성요소 1 ( Vector DB ) (0) | 2024.08.21 |
| [AI] RAG ( Retrieval Augmented Generation ) 의 기초 (0) | 2024.08.20 |

